Aseptic techniques help prevent infections by maintaining cleanliness.
Aims of Aseptic Technique
Prevent infections in patients.
Stop the spread of microorganisms.
Protect healthcare workers from infections.
Indications for Aseptic Technique
Used during procedures like:
Wound care and suturing.
Inserting catheters, IV lines, and tubes.
Surgical procedures and biopsies.
Principles of Medical Asepsis
Wash hands before and after patient contact.
Wear gloves and masks when needed.
Keep soiled items separate from clean ones.
Dispose of waste properly to prevent contamination.
Avoid touching face, nose, or mouth while handling sterile items.
Principles of Surgical Asepsis
Only sterile objects can touch other sterile objects.
Open sterile packages carefully to avoid contamination.
Use sterile drapes to create a sterile field.
Do not talk, cough, or sneeze over a sterile field.
Never turn your back on a sterile field.
Consider the outer 1 inch of a sterile field contaminated.
Differences Between Medical and Surgical Asepsis
fig: Differences Between Medical and Surgical Asepsis
Medical Asepsis (Clean)
Surgical Asepsis (Sterile)
Reduces microorganisms
Eliminates all microorganisms
Prevents the spread of germs
Used in surgeries & invasive procedures
Uses clean techniques (e.g., handwashing)
Uses sterile techniques (e.g., surgical dressing)
Gloves protect the worker
Sterile gloves protect the patient
Hand Hygiene
Hand hygiene is the most effective way to prevent infections and stop the spread of harmful germs. It includes hand washing with soap and water and the use of hand rubs (sanitizers).
Hand Washing
Definition: Hand washing is the process of rubbing hands with soap and water to remove dirt, germs, and microorganisms.
Purpose:
Removes harmful germs from the hands.
Prevents infections in patients and healthcare workers.
When to Wash Hands?(as per Gamer and Favero, 1985)
Before touching patients.
After patient contact.
After exposure to body fluids.
Before invasive procedures (e.g., injections).
Before and after wound care.
After handling contaminated equipment.
Between contacts in high-risk areas.
After removing gloves.
Hand Washing Procedure
Materials Required:
✅ Running water (preferably warm) ✅ Antimicrobial or regular soap ✅ Clean towel
Steps for Hand Washing:
1️⃣ Wet hands under running water. Keep hands lower than elbows. 2️⃣ Apply soap and rub palms together in circular motions. 3️⃣ Rub the back of each hand with interlaced fingers. 4️⃣ Interlock fingers and rub between them. 5️⃣ Rub the back of fingers against opposite palms. 6️⃣ Rub thumbs in the opposite hand using a rotating motion. 7️⃣ Rub fingertips in circular motions on opposite palms. 8️⃣ Rub wrists, then rinse hands under running water. 9️⃣ Dry hands with a clean towel.
💡 Wash hands for at least 15-20 seconds as recommended by the CDC.
Surgical Hand Washing
Surgical hand washing is a more thorough process to eliminate all microorganisms, including spores and pathogens.
Materials Required:
✅ Antimicrobial soap/antiseptic solution ✅ Running warm water ✅ Nail brush ✅ Sterile towels
Procedure:
1️⃣ Remove jewelry and roll up sleeves. 2️⃣ Check hands for cuts or wounds. 3️⃣ Wet hands and forearms under running water. 4️⃣ Apply antiseptic soap and scrub hands, nails, and arms up to elbows. 5️⃣ Use a nail brush to clean under nails. 6️⃣ Rinse hands under running water, keeping hands above elbows. 7️⃣ Dry hands with a sterile towel, using separate sides for each hand. 8️⃣ Avoid touching anything before wearing sterile gloves.
💡 Key Points: ✔ Always wash from least contaminated (elbows) to most contaminated (hands). ✔ Keep hands above elbows to prevent contamination. ✔ Do not touch the faucet after washing.
Use of Hand Rub (Hand Sanitizer)
💡 When soap and water are unavailable, use an alcohol-based hand rub.
Steps:
1️⃣ Apply a small amount of sanitizer (at least 60% alcohol). 2️⃣ Rub palms together. 3️⃣ Rub the back of hands and between fingers. 4️⃣ Rub thumbs and fingertips. 5️⃣ Continue rubbing until hands are dry.
✔ Quick and effective for killing germs. ❌ Does not remove visible dirt or grease.
Learn essential growth monitoring methods for B.Sc Nursing students in community areas. This includes anthropometric measurements and Gomez classification. It also involves measuring vital signs, menstrual cycle tracking, and testicular self-examination (TSE).
Table of Contents
Methods of Growth Monitoring
Growth monitoring is essential for assessing a child’s development and identifying malnutrition early. Various methods are used, including growth charting and anthropometric measurements.
1. Growth Charting
Growth charts were initially designed by David Morley and later modified by the World Health Organization (WHO). Also known as the “road-to-health” chart, they visually represent a child’s growth and development.
Under the Integrated Child Development Services (ICDS), a Mother and Child Protection Card is used separately for boys and girls.
This card includes information on family identification and birth record. It also covers pregnancy details, immunization schedules, nutrition, and milestones. There are special care requirements under schemes like Janani Suraksha Yojana.
Basic Features of Growth Charts:
Weight-for-age chart does not consider height.
Weight is a more sensitive indicator of growth than height.
Deviation from normal growth curves signals potential health issues.
A child can lose weight but not height due to malnutrition.
When plotted correctly, growth charts provide early detection of growth failure, especially Protein-Energy Malnutrition (PEM).
Uses of Growth Charts:
Growth Monitoring: Helps track child health in a simple, cost-effective way.
Diagnostic Tool: Identifies high-risk children, especially those with malnutrition.
Planning and Policy-Making Tool: Supports health programs and decision-making.
Intervention Tool: Guides health workers in planning appropriate actions.
Teaching Tool: Used in health education about feeding, nutrition, and illnesses.
Evaluation Tool: Measures the impact of health interventions.
2. Anthropometric Measurements
These measurements help assess a child’s growth and nutritional status by comparing them to standard reference values.
Key Measurements:
Weight: A primary indicator of physical growth. Periodic weight checks (especially in ages 1-5 years) help detect growth faltering.
Height: Indicates long-term growth trends. Low height-for-age is called nutritional stunting, a sign of past malnutrition.
Head and Chest Circumference: At birth, head circumference (HC) is larger than chest circumference (CC). In severe malnutrition, CC may take longer (3-4 years) to surpass HC due to poor thoracic growth.
Mid-Arm Circumference (MAC): Reflects muscle mass and nutritional status. A decrease signals malnutrition.
Interpretation of Anthropometric Data:
Mean or Median: A variation of ±2 standard deviations is considered normal.
Percentile or Centiles:
Below the 3rd percentile or above the 97th percentile is unusual but not necessarily abnormal.
Weight-for-Height/Length:
<70% of expected weight-for-height indicates severe malnutrition.
WHO standards guide weight assessments.
3. Grading Malnutrition
Several classifications assess malnutrition severity:
1. Waterlow’s Classification (Stunting & Wasting)
Category
Stunting (Height-for-Age %)
Wasting (Weight-for-Height %)
Normal
>95%
>90%
Mild
87.5-95%
80-87.5%
Moderate
80-90%
70-80%
Severe
<80%
<70%
2. Gomez Classification (Weight-for-Age %)
Category
Reference Weight %
Normal
90-110%
Mild Malnutrition (Grade I)
75-89%
Moderate Malnutrition (Grade II)
60-74%
Severe Malnutrition (Grade III)
<60%
3. Indian Academy of Pediatrics (IAP) Classification
Grade I: 70-80% of standard weight-for-age
Grade II: 60-70%
Grade III: 50-60%
Grade IV: <50%
4. WHO/UNICEF Malnutrition Criteria
Moderate Acute Malnutrition (MAM): Weight-for-Height Z-score <-2 but >-3.
Severe Acute Malnutrition (SAM):
Weight-for-Height Z-score <-3.
Mid-Upper Arm Circumference (MUAC) <11.5 cm.
Bilateral pitting edema (Marasmic-Kwashiorkor).
4. Measuring Weight Using Salter Scale
The Salter scale is a spring hanging scale used for weighing preschool children. It measures up to 25 kg with 100 g accuracy.
Steps for Measuring Weight:
Hook the scale securely at eye level.
Hang the weighing pants on the lower hook.
Set the scale to zero before weighing.
Undress the infant and place them in the weighing pan.
Ensure the child hangs freely without support.
Record weight only when stable, to the nearest 100 g.
Inform the parent of the child’s weight and compare with previous records.
Purpose of Weighing:
Assess growth and health status.
Calculate drug dosages.
Determine BMI for underweight/obesity screening.
Articles Required:
Weighing scale.
Health card and pen to record weight.
Steps Involved:
Establish rapport with parent and child.
Explain the procedure.
Check previous weight records.
Place the scale on a firm, level surface.
Remove shoes and heavy clothing.
Ensure the child stands properly on the scale.
Record weight to the nearest decimal fraction.
Inform the parent about the child’s weight progress.
Measuring Vital Signs
Oral Temperature Using Community Health Nursing Bag
Steps Involved
Preparation:
Spread a newspaper or a plastic square on a flat surface and place the community health nursing bag on it.
Obtain a newspaper. Use it to make a paper bag for discarding soiled cotton. Place the bag at one corner of the spread-out newspaper.
Explain the importance of the paper bag to the family and keep it standing in one corner.
Hand Hygiene:
Remove your watch and pin it securely (e.g., on a sari or salwar kameez).
Identify a suitable washing area with the help of a family member.
Wash hands thoroughly with soap and water for 3-5 minutes, following proper handwashing techniques.
Be mindful of water usage, especially in areas with water scarcity.
Dry hands using air or a towel.
Setting Up Equipment:
Return to the working area where the bag is placed.
Lift the unzipped outer covering of the upper compartment using the elbow.
Open the inner cardboard lining by pulling the attached small cloth piece.
Take out the necessary items for checking oral temperature. These include an oral thermometer, two cotton balls, a long layer of cotton for disinfection, and spirit. Place these on the newspaper.
Close the inner cardboard lining to prevent contamination.
Cleaning and Measuring Temperature:
Take the oral thermometer to the wash area.
Wash it under running cold water or pour water over it.
Use a cotton ball from the newspaper to wipe the thermometer from bulb to stem.
Explain the procedure to the patient, obtain consent, and place the thermometer under the tongue.
Ask the patient to close their mouth carefully and hold the thermometer in place with their lips.
Wait for three minutes.
Remove the thermometer. Read the temperature at eye level. Wipe it from stem to bulb with the used cotton ball.
Discard the used cotton into the paper bag.
Post-Procedure Care:
Wrap the thermometer in a long cotton strip soaked with soap and leave it for 10-15 minutes.
Use this time to collect patient history, provide health education, or conduct physical/nutritional assessments.
After 10-15 minutes, remove the thermometer. Clean it using a spiral motion with a fresh cotton ball. Rinse it with water and dry it. Disinfect with spirit. Lastly, place it back in its case.
Wash hands thoroughly.
Securely dispose of the soapy cotton swab in the paper bag and give it to a family member for safe disposal (e.g., burning).
Repack all items in the bag and zip it properly.
Fold the newspaper, ensuring the side that touched the floor remains inside.
Dry the towel upon returning to the health center.
Measuring Blood Pressure
Purpose:
To assess systolic and diastolic arterial blood pressure.
Equipment Needed:
Sphygmomanometer with cuff
Stethoscope
Antiseptic solution
Paper bag for disposal
Procedure:
Preparation:
Explain the procedure to the patient or their relative.
Arrange the equipment in a convenient workspace.
Expose the patient’s arm above the elbow and ensure they are relaxed.
Cuff Placement:
Position the compression bag over the inner aspect of the arm, approximately 1 inch above the elbow.
Before application, squeeze and expel excess air from the cuff.
Secure the strap firmly using the Velcro sleeve band.
Adjust the manometer to eye level.
Palpation and Inflation:
Locate the brachial artery by palpation at the antecubital area.
Tighten the screw on the inflation bulb.
Inflate the cuff until the brachial pulse is no longer palpable.
Increase pressure by an additional 20-30 mmHg beyond the point where the pulse disappeared.
Auscultation and Reading Blood Pressure:
Place the diaphragm or bell of the stethoscope over the brachial artery.
Insert the stethoscope earpieces correctly, pointing forward.
Slowly release the pressure valve, allowing the mercury to fall at 2-3 mmHg per second.
Listen for the first pulse sound (systolic pressure).
Continue releasing pressure until the last pulse sound is heard (diastolic pressure).
Rapidly release the remaining pressure and remove the cuff.
Post-Procedure Care:
Clean the stethoscope’s bell or diaphragm with antiseptic solution.
Discard the used swab in the paper bag for safe disposal.
Menstrual Cycle
Definition & Basics
Menstruation: Shedding of the uterus lining if no pregnancy occurs.
Menarche: First menstrual period, marking puberty onset.
Cycle Duration: Typically 28 days (can range from 21-42 days).
Menstrual Flow: Lasts about 4-5 days, with 50-60mL blood loss.
Explore the body’s natural defenses against infection and how the immune system functions to protect health. Essential nursing knowledge.
Table of Contents
Body Defenses Against Infection: Understanding the Immune System
The body’s defense against infections is a complex process. It involves the immune system. The system works to resist the transmission of harmful agents. Immunity is the body’s ability to recognize and eliminate foreign materials that enter the system. This process helps prevent infections, diseases, and other unwanted biological invasions.
What is Immunity?
Immunity is the ability to protect the body from pathogens such as bacteria, viruses, fungi, and other microorganisms. The immune system detects and fights off these harmful agents through the recognition of antigens. Antigens are proteins found on the surface of cells, viruses, fungi, bacteria, and even toxins or drugs. The immune system identifies these foreign substances and initiates responses to destroy or neutralize them.
Role of the Immune Response
The immune response refers to the body’s method of identifying and attacking harmful microorganisms. When the immune system is compromised or unable to respond properly, an infection may develop. Efficient immune responses are crucial in preventing the spread of diseases and maintaining overall health.
Inflammatory Response: The Body’s Defense Mechanism
Inflammation is a key part of the immune system’s response to infection, injury, and irritation. The body’s white blood cells release chemicals. This protects against harmful substances like bacteria, viruses, and chemicals. Inflammation results in redness, swelling, heat, and sometimes pain, all signs of the immune system working to fight off infection.
Types of Inflammation
Acute Inflammation: Acute inflammation occurs immediately after an injury or infection, serving as a protective measure. It usually lasts for less than two weeks. Once the harmful agent is removed, the inflammation subsides, allowing healing and return to normal function.
Chronic Inflammation: Chronic inflammation develops when the harmful agent remains or the inflammation process does not resolve. It may lead to tissue damage, scarring, and the persistence of infection. Chronic inflammation is linked to conditions like rheumatoid arthritis, autoimmune diseases, and cardiovascular diseases.
Subacute Inflammation: This type of inflammation is a mix of acute and chronic inflammation. It may last longer than acute inflammation but does not fully develop into chronic inflammation. It is a less common stage and involves both tissue repair and ongoing immune responses.
Causes of Inflammation
Inflammation is a protective response by living tissue to any injury or harmful stimuli. It plays a crucial role in healing but can also cause damage if not properly controlled. The body releases chemicals from white blood cells to address infection, injury, or foreign substances. This leads to increased blood flow, swelling, and often pain at the site of injury.
Physical Causes
Mechanical injuries like car accidents, assaults, or falls.
Environmental factors such as extreme cold or heat, including burns or frostbite.
Chemical Causes
Exposure to harmful chemicals such as acid burns, drugs, or venom from insects or animals.
Infection
Bacteria, viruses, fungi, or parasites can invade the body, causing infection and triggering an inflammatory response.
Ischemia
Restricted blood supply to tissues, often due to a blockage or injury, leading to tissue damage and even cell death.
Immune Responses
Autoimmune diseases (e.g., rheumatoid arthritis) and allergies can cause the immune system to attack the body’s own tissues, leading to chronic inflammation.
Signs of Inflammation: Identifying the Response
Inflammation manifests in 5 cardinal signs, each indicating a physiological reaction to tissue injury:
fig : inflammation signs
Redness (Erythema):
Caused by the dilation (widening) of blood vessels, leading to increased blood flow to the affected area.
Warmth (Heat):
Due to increased blood flow and metabolic activity in the area of inflammation.
Swelling (Edema):
Results from fluid and white blood cells (leukocytes) accumulating in the tissues, causing the area to expand.
Pain:
Triggered by the release of chemicals from damaged cells, and may also involve the irritation of nerves in the area.
Loss of Function:
Caused by increased swelling and pain, which may impair movement or proper functioning of the affected area.
Additionally, fever may occur as a result of the release of endogenous pyrogens from immune cells like neutrophils and macrophages.
The Process of Inflammation: How the Body Responds
The process of inflammation involves a series of steps designed to protect and heal tissues. Here’s how it works:
Vasodilation:
The arterioles (small blood vessels) near the injury site widen, increasing blood flow, leading to redness and warmth.
Vascular Permeability:
Endothelial cells in blood vessels become more permeable. This permeability allows fluid, white blood cells, and chemical mediators to leak into the surrounding tissues.
Exudation:
Fluid, proteins, red blood cells, and white blood cells move from the bloodstream into the tissue. They help to fight infection. They also aid tissue repair.
Vascular Stasis:
Blood flow slows down. This allows chemical mediators and immune cells to gather and focus on healing. They also work on defending the affected tissue.
Stages of the Inflammatory Reaction
The inflammatory reaction is a complex and overlapping sequence of events that occur in response to tissue injury. Although these events happen simultaneously, they can be grouped into distinct stages:
1. Tissue Injury
Tissue damage occurs from various causes, including trauma (e.g., tackles, collisions, falls) or microtrauma (repetitive strain or overuse). This injury triggers the body’s inflammatory response, which is essential for the healing process.
2. Release of Chemicals
When tissue cells are injured, they release a variety of chemical mediators, including:
Histamine
Serotonin
Bradykinin
Prostaglandins
Lymphokines
These chemicals initiate the inflammatory process by causing vasodilation (widening of blood vessels). They also increase vascular permeability (leakage of fluid from capillaries). The increased blood flow to the affected site causes the classic signs of redness (erythema) and warmth. The chemical mediators act as messengers. They attract white blood cells (leukocytes) to the area. This process is known as chemotaxis.
3. Leukocyte Migration
In response to chemotaxis, leukocytes (white blood cells) migrate to the injured area. Two main types of leukocytes involved in this phase are:
Neutrophils: These are the first responders to the injury. They help neutralize harmful bacteria and clear debris from the site.
Macrophages: These cells arrive 72 hours after injury and continue to clear debris and bacteria. They play a crucial role in the healing process, helping to prepare the area for new tissue growth.
These cells engulf bacteria, dead cells, and other debris. This engulfing is essential for clearing the area. It allows new cells to regenerate. Over time, destroyed tissue is replaced by fibrous (scar) tissue, which can affect the tissue’s functional capacity.
4. Tissue Healing
Tissue healing occurs in several overlapping stages:
Collagenation: Fibroblasts start producing collagen, creating a matrix that supports new tissue growth. This process occurs as macrophages clean the injured area and prepare it for regeneration.
Angiogenesis: New blood vessels (capillaries) form in a process called angiogenesis or revascularization. This provides the necessary blood supply to the healing tissue, facilitating the growth of new cells. For instance, in muscle injuries, muscle cells repopulate the area as blood flow is restored.
5. Proliferation
This phase can last up to 4 weeks. During this time, the body focuses on tissue repair. In cases of severe injury, the area may form granulation tissue. It consists of a mixture of specific tissue cells and other cells. If this tissue is not removed, it can turn into scar tissue, which may decrease the function of the tissue.
6. Remodeling
Remodeling is the final stage of healing. In this stage, the new cells and collagen fibers are reorganized. They adapt to the tissue stresses. This phase can take months or even years, as the tissue gradually regains its functionality. Proper stretching can optimize the strength of the new tissue during this phase. Rehabilitation helps improve its ability to function normally.
Immune Response
The immune response includes several defense mechanisms. The body uses these to protect itself from foreign invaders, such as bacteria, viruses, and other pathogens. It can be broken down into three lines of defense: physical and chemical barriers, nonspecific responses, and specific responses. These defenses work together to protect the body from infections.
A. Nonspecific Immune Responses
Nonspecific immune defenses are the body’s first line of defense against pathogens. They act as general defenses and are not tailored to specific types of pathogens. They include:
1. Physical and Chemical Barriers
Skin: The skin serves as the body’s primary physical barrier. When intact, it prevents microorganisms from entering the body.
Mucous Membranes: These membranes secrete mucus to trap microbes, preventing their spread into deeper tissues.
Hair: Hair in the nose filters microbes, dust, and pollutants from the air, preventing them from entering the respiratory system.
Cilia: The cilia in the upper respiratory tract trap inhaled debris. They move it toward the throat to be expelled from the body.
Stomach Acid: The hydrochloric acid in the stomach kills pathogens that are ingested through food or water. This serves as a chemical barrier to infection.
Lysozymes: Found in tears, sweat, and saliva. Lysozyme is an enzyme that breaks down bacterial cell walls. It acts as a natural antibiotic.
Hyaluronic Acid: This gelatinous substance in tissues slows the spread of harmful microorganisms.
Saliva: Saliva dilutes microorganisms in the mouth, washing away debris. It contains microbial inhibitors like lysozyme, lactoferrin, and secretory IgA.
Sebum: Produced by the skin, sebum contains unsaturated fatty acids that create a protective film, inhibiting bacterial growth.
2. Inflammatory Response
When tissue is damaged due to injury or infection, the body activates the inflammatory response. This nonspecific reaction involves an increased blood supply to the affected area. There are changes in vascular permeability. This allows immune cells to reach the site of injury or infection. Key features of inflammation include:
Swelling
Redness
Heat
Pain
The inflammatory response ensures that immune cells, such as neutrophils and mononuclear cells, move to the site of infection. At this location, they combat invading pathogens.
B. Specific Immune Responses
When nonspecific defenses are not enough to eliminate an infection, the body activates the specific immune response. This response is part of acquired immunity. This response targets specific pathogens and involves various components, such as antibodies and T cells.
1. Phagocytic Immune Response
Phagocytosis is the process in which phagocytes (such as neutrophils and macrophages) engulf and digest microorganisms. Phagocytes also remove dead or dying cells from the body, maintaining tissue health. Apoptosis, a form of programmed cell death, helps eliminate potentially harmful cells in an orderly manner.
2. Antibody Immune Response
This component, also known as humoral immunity, involves B lymphocytes (B cells) that produce antibodies. Antibodies are large molecules that target specific pathogens. The antibody immune response is effective against:
Extracellular bacterial pathogens
Viruses that enter through the respiratory or intestinal tracts
Prevention of recurrent viral infections
There are five major classes of immunoglobulins (antibodies): IgG, IgE, IgD, IgM, and IgA. These antibodies play crucial roles in recognizing and neutralizing pathogens.
3. Cellular Immune Response
Cell-mediated immunity does not involve antibodies. Instead, it relies on T lymphocytes (T cells). There are two main types of T cells:
Cytotoxic T cells: These cells destroy infected or abnormal cells.
Helper T cells: These cells assist other immune cells by releasing chemical signals called lymphokines.
When a T cell recognizes an antigen, it binds to it and becomes sensitized. Sensitized T cells travel to the infection site, where they release lymphokines to attract macrophages. This type of immunity is crucial for combating viral infections, slow-growing bacterial infections, fungal infections, and cancerous cells.
Stages of Immune Response
The immune response follows a structured process that can be divided into four distinct stages: recognition, proliferation, response, and effector. Each stage plays a critical role in defending the body from infections and ensuring a tailored, effective immune reaction.
(i) Recognition Stage
The first step in the immune response is for the body to recognize foreign invaders. The immune system must identify substances or pathogens that are not part of the body (non-self). This recognition process involves lymphocytes and macrophages:
Lymph nodes and lymphocytes constantly survey the body through the bloodstream.
Macrophages encounter foreign material, either removing or imprinting its structure to mark it as an invader.
The immune system distinguishes between the body’s own structures (self) and foreign markers (antigens). This differentiation triggers the next stage of the immune response: proliferation.
(ii) Proliferation Stage
In the proliferation stage, the immune system amplifies the response:
The lymphocyte that encountered the foreign invader returns to the lymph node to relay the message.
This stimulates the activation of T lymphocytes and B lymphocytes, which enlarge, divide, and proliferate in response to the antigen.
T lymphocytes, also known as cytotoxic T cells (killer T cells), are prepared to directly attack infected cells.
B lymphocytes stimulate the production and release of antibodies, essential for neutralizing pathogens.
(iii) Response Stage
In this stage, the immune system’s response is carried out either in a humoral or cellular fashion:
Humoral Response: The B lymphocytes produce antibodies in response to the antigen. These antibodies are released into the bloodstream and circulate in the plasma, targeting pathogens or toxins directly.
Cellular Response: The sensitized T cells return to the lymph nodes. There, they stimulate other lymphocytes. They particularly stimulate cytotoxic T cells (killer T cells). These cells then attack and destroy the infected cells directly by binding to the pathogen or infected tissue.
(iv) Effector Stage
The final stage involves the effector action, where the immune system clears the infection:
Antibodies or cytotoxic T cells bind to the antigens on the surface of the foreign invader.
This interaction triggers a series of events that lead to the destruction of the pathogen or the neutralization of toxins.
The complement system, along with killer T cells, helps amplify this process. It ensures that the invader is effectively eliminated from the body.
Learn about infection, its definition, sources, chain of infection, and types. Essential nursing notes for students with simple explanations.
Table of Contents
Infection: Definition, Sources, and Nature
What is an Infection?
An infection is the invasion and multiplication of harmful microorganisms (bacteria, viruses, fungi, protozoa, rickettsia) in the body, causing disease. It can be localized (affecting one area) or generalized (spreading throughout the body).
1. Infectious Agents: Microorganisms that cause diseases are called pathogens. If they spread easily from person to person, they are called communicable diseases.
2. Colonization vs. Infection:
Colonization: Microbes grow on/in the body but do not cause disease.
Infection: Microbes invade tissues and cause harm.
3. Body’s Defense Mechanisms Against Infection:
Skin: Acts as a protective barrier; constantly sheds dead cells.
Mucous Membranes: Trap microbes and prevent entry.
Tears & Saliva: Wash away harmful particles.
Stomach Acid: Kills bacteria in food.
Cilia in Airways: Remove microbes before they reach the lungs.
Immune System: Fights off infections through white blood cells and antibodies.
Routes of Infection Entry
Skin (cuts, wounds, insect bites)
Respiratory System (airborne infections like tuberculosis, COVID-19)
Digestive System (contaminated food and water, causing cholera, typhoid)
Vaccination (protecting against communicable diseases)
Use of protective equipment (gloves, masks, sterilization in healthcare settings)
Safe sex practices (using protection to prevent STDs)
Insect control (mosquito nets, repellents to prevent malaria, dengue)
Chain of Infection
A susceptible host or the presence of a pathogen alone does not guarantee an infectious process. The chain of infection describes how an infectious process develops. It involves an interaction between the agent, host, and environment. Several essential elements, or “links in the chain,” must be present for microorganisms to be transmitted and cause infection. Understanding this process helps in controlling or eliminating microorganisms by breaking the links in the chain.
Fig : chain of infection
Links in the Chain of Infection:
Infectious Agent
Reservoir
Portal of Exit
Mode of Transmission
Portal of Entry
Susceptible Host
1. Infectious Agent
The infectious agent is the microorganism responsible for causing disease. Its ability to thrive depends on three factors:
Virulence: Severity or harmfulness of the microorganism.
Invasiveness: Ability to enter tissue.
Pathogenicity: Ability to produce or cause disease.
Types of Infectious Agents:
Viruses: Obligate intracellular agents requiring host machinery for replication. Classified by their nucleic acid type (DNA or RNA) and capsid shape.
Bacteria: Unicellular organisms without chlorophyll, possessing both DNA and RNA. Classified by shape as cocci (spherical) or bacilli (rod-shaped).
Fungi: Eukaryotic organisms lacking chlorophyll, reproducing by budding or spore formation. Types include molds, yeasts, yeast-like fungi, and dimorphic fungi.
Protozoan Parasites: Single-celled eukaryotes that cause diseases and are often transmitted by insect vectors.
Helminths: Multicellular parasitic worms with complex life cycles. Includes roundworms, flatworms, and flukes.
2. Reservoir
A reservoir is a place where microorganisms can thrive and reproduce. It can be:
Animate: Humans, animals, birds, and insects.
Inanimate: Soil, water, food, feces, intravenous fluids, and medical equipment.
Types of Carriers:
Healthy Carrier: Harbors the pathogen without symptoms.
Convalescent Carrier: Recovered but still carries the pathogen.
Incubatory Carrier: Infectious before symptoms appear.
Inapparent Carrier: Transmits infection without developing symptoms.
Chronic Carrier: Recovered but continues to carry the pathogen.
Human Reservoirs and Transmission:
Reservoir
Transmission Vehicle
Infectious Agent
Blood
Needle stick, contaminated equipment
Hepatitis B, C, HIV/AIDS, S. aureus
Tissue
Wound drainage
S. aureus, E. coli, Proteus species
Respiratory Tract
Airborne droplets
Influenza, SARS, Klebsiella, S. aureus
Gastrointestinal Tract
Vomitus, feces, saliva
Hepatitis A, Shigella, Salmonella
Urinary Tract
Urine
E. coli, Enterococci, Pseudomonas
Reproductive Tract
Urine, semen
N. gonorrhoeae, T. pallidum, Herpes simplex, Hepatitis B
Tab: Human Reservoirs and Transmission
3. Portal of Exit
The portal of exit is the path through which pathogens leave the reservoir. Examples include:
Blood: Transmission through transfusion or direct contact.
4. Mode of Transmission
The mode of transmission describes how the infectious agent moves from the portal of exit. It travels to the portal of entry of a new host. The five primary transmission modes include:
a) Contact Transmission:
Direct Contact: Physical transfer via touching, kissing.
Indirect Contact: Transfer through contaminated objects like linens, dressings, and medical equipment.
b) Droplet Transmission:
Infectious droplets from sneezing, coughing, or talking.
Occurs within a 3-foot range.
c) Airborne Transmission:
Inhalation of droplet nuclei or dust particles containing infectious agents (e.g., tuberculosis, measles, varicella).
d) Vector Transmission:
Transmission by insects like mosquitoes (e.g., malaria) and fleas (e.g., plague).
e) Vehicle Transmission:
Contaminated food, water, milk, drugs, or blood (e.g., hepatitis, HIV via blood transfusion).
5. Portal of Entry
The portal of entry is how the infectious agent enters a new host. Entry occurs through:
Infection control is one of the most practical, exam-heavy, and clinically urgent topics in Community Health Nursing. For every GNM, B.Sc Nursing and Post Basic student, mastering infection prevention is not just a theory paper requirement — it is a daily responsibility on the ward, in the OT, during home visits and in community outreach programmes.
Why Infection Control Matters in Nursing
According to the World Health Organization (WHO), 7 out of every 100 patients in acute-care hospitals in developed countries, and 10 out of 100 in developing countries, acquire at least one healthcare-associated infection (HAI) during their stay. In India, surveillance data from ICMR AMR Hub consistently shows ventilator-associated pneumonia, catheter-associated urinary tract infections and surgical site infections as the top three HAIs. Nurses are the first line of defence — because hand hygiene, aseptic technique, correct PPE use and biomedical waste segregation are nursing-led activities on every shift.
What You Will Learn in This Guide
This 15-chapter unit walks you through every concept that commonly appears in both internal and university exams. Starting with the nature of infection, you’ll move through the classic chain of infection (agent → reservoir → portal of exit → mode of transmission → portal of entry → susceptible host), the stages of infection, host-defence mechanisms, and the differences between medical and surgical asepsis. You’ll also study the WHO 5 Moments of Hand Hygiene, correct donning and doffing of PPE, and the Bio-Medical Waste Management Rules 2016 (amended 2019) that are directly tested in Karnataka, All-India, NORCET and State-level nursing exams.
How to Use This Index
The table below is the complete unit roadmap. Follow it in order on a first read; from then on, use it as a quick revision checklist. Each linked topic opens into a detailed PDF-grade note with diagrams, exam-weighted MCQs and viva questions. Clinical students are strongly advised to pair this unit with the hands-on infection-control practical record and checklist available in our Study Materials shop.
“Learn essential steps for infection control in clinical settings. Protect patients & staff with effective hygiene, asepsis, & safety protocols.”
Master the top nursing documentation methods and reporting guidelines! Learn the do’s and don’ts, types of reports, and best practices for accurate patient care records.
✅ Discover the types of client records and reports in health care documentation. Learn their purposes, confidentiality rules, and best practices.
Table of Contents
What is Documentation?
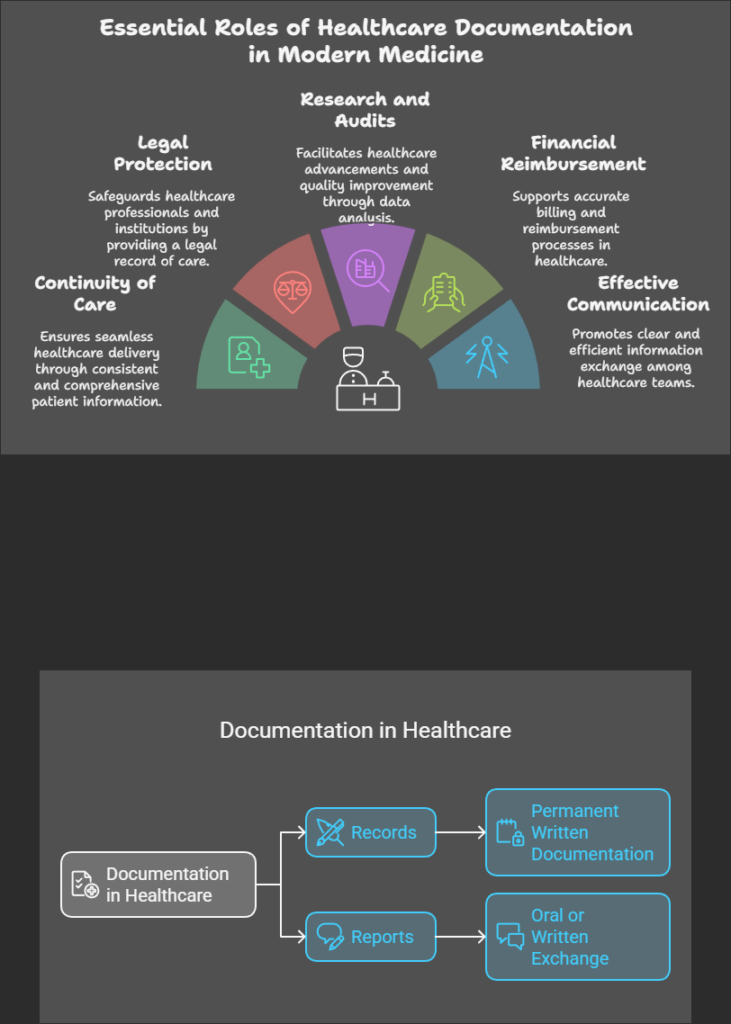
Documentation in healthcare is the process of recording patient information, treatments, and outcomes. It ensures continuity of care, enhances communication among healthcare professionals, and serves as legal and research evidence.
Importance of Documentation in Nursing
Ensures continuity of care
Provides legal protection
Supports research and audits
Aids in financial reimbursement
Enhances effective communication
Documentation in health care
Types of Documentation
Records – Permanent written documentation of patient care.
Reports – Oral or written exchange of information.
Records in Healthcare
A record is a permanent document related to a patient’s healthcare, covering admission to discharge. It serves as a clinical, scientific, administrative, and legal document.
Purpose of Records
Acts as a communication tool among healthcare teams.
Provides data for research and program evaluation.
Helps in legal protection and nursing audits.
Supports continuity of care and planning.
Aids in financial reimbursement and hospital management.
Reports in Healthcare
A report is an oral or written communication used to exchange patient information.
Purpose of Reports
Ensures proper healthcare planning.
Helps in goal setting and service evaluation.
Provides accurate information for legal and administrative purposes.
Assists in public health studies.
Enhances team coordination and efficiency.
Key Purposes of Documentation
Communication – Ensures smooth information transfer among healthcare teams.
Planning Patient Care – Supports personalized treatment plans.
Legal Record – Serves as a legally admissible document.
Education – Acts as a reference for medical students.
Research – Provides data for healthcare improvements.
Audit – Helps in evaluating nursing and hospital services.
Financial Reimbursement – Essential for insurance claims and government funding.
CONFIDENTIALITY
Confidentiality is the protection of personal information. It means keeping client information private and not sharing it with others, including coworkers, friends, or family. Information acquired while at work should not be disclosed to outsiders without written consent from the patient. Only authorized healthcare personnel involved in diagnosis, treatment, and care are entitled to access patient documents.
Managing Data Confidentiality
Consider the following when handling confidential information:
To whom data can be disclosed
Whether laws, regulations, or contracts require data to remain confidential
Whether data may only be used or released under specific conditions
Whether data is sensitive by nature and could have a negative impact if disclosed
Whether data would be valuable to unauthorized parties (e.g., hackers)
The information contained in patient documents is strictly confidential. Patient documents refer to records needed to arrange and provide care. Confidential information includes:
Name, date of birth, age, sex, and address
Current contact details of family or guardians
Medical history and records
Personal care details
Service records and progress notes
Individual care plans
Assessments or reports
Incoming or outgoing personal correspondence
TYPES OF CLIENT RECORDS
Client records are essential to healthcare. All health professionals have a legal and ethical responsibility to maintain accurate client records while ensuring privacy. Good record-keeping is a key component of quality healthcare.
The primary use of client records is to help healthcare professionals understand medical history and identify problems. The client health record is a legal document that helps manage patient care.
Types of Records
1. Outpatient Records
Outpatient records are maintained in the form of outpatient cards. These include:
Referral number
Patient’s biodata
Medical history (past and present)
Family history
Investigation reports
Diagnosis and treatment
Frequency of visits and prognosis
Stored in the outpatient record department
2. Inpatient Records
Inpatient records are a continuation of outpatient records. They document the patient’s stay in the hospital and include:
Admission Records
Medical History Records
Observation Records
Laboratory Investigation Records
Intake and Output Records
Doctor’s Order Sheet
Treatment Records
Diet Records
Prognosis Records
Nurses’ Notes
Discharge Records
3. Nurses’ Records
Nurses maintain essential patient-related records, which are stored in the nurses’ duty room. These include:
Nurse’s Notes
Admission-Discharge Register
Birth Register
Death Register
Accident Record
Duty Roster
Indent Register
Inventory Register
Stock Register
Change of Shift Record
Nurse’s Progress Record
Staff-Patient Assignment Record
COMMON RECORD-KEEPING FORMS
A variety of forms are used to document a client’s health status, problems, and responses to interventions. These include:
1. Nursing Kardex
The Nursing Kardex is a client profile and summary sheet. It consists of index cards stored in a specific location or portable file. It contains essential patient information and serves as a quick reference for nurses throughout their shifts and during handovers.
The Kardex should be updated with every change in patient orders and used as a communication tool between shifts. It typically includes:
Basic demographic data
Primary medical diagnosis
Nursing care plan
Laboratory tests
Physician’s orders
2. Nursing History Form
The Nursing History or Nursing Assessment Form is completed upon a client’s hospital admission. It includes a comprehensive assessment to identify relevant nursing diagnoses. This form provides baseline data for monitoring changes in the client’s condition. It generally records:
Allergies
Advance directives
Disabilities and mobility status
Medication reconciliation
Each hospital may have its own standardized nursing history form based on practice guidelines.
3. Graphic and Flow Sheets
Flow sheets contain vertical and horizontal columns for recording data over time, helping to track client conditions and interventions efficiently. They are particularly useful for documenting:
Vital signs
Intake and output
Hygiene measures
Medication administration
Pain assessment
IV therapy
Flow sheets provide a quick reference in clinical settings, especially in critical care units. However, significant changes or unusual events should still be documented in progress notes.
4. Nurse’s Progress Notes
Nurses’ progress notes document client problems, complaints, interventions, responses, and progress toward goals. They may follow various documentation formats, such as SOAP (Subjective, Objective, Assessment, Plan), PIE (Problem, Intervention, Evaluation), or focus charting.
Progress notes may include:
Nurse’s notes
Medication Administration Record (MAR)
Personal care flow sheets
Teaching records
Intake and output forms
Vital signs records
Diabetic assessment forms
Neurological assessment forms
5. Standardized Care Plans
Standardized care plans are based on institutional nursing practice standards. The nurse first conducts an assessment. Then, the nurse prepares a care plan tailored to the client’s needs. Finally, the plan is placed in the medical record.
Standardized care plans improve continuity of care. However, they have some limitations. These limitations include inhibiting individualized therapy and potentially replacing nurses’ critical thinking. They must be updated regularly.
A standardized care plan typically consists of five columns:
Nursing Diagnosis – Prioritized based on severity
Expected Outcomes – Goals for the patient’s recovery
Nursing Care Interventions – Actions taken to address the diagnosis
Scientific Rationale – Justification for interventions
Evaluation – Assessment of intervention effectiveness
S. No
Nursing Diagnosis
Expected Outcome
Nursing Care
Scientific Rationale
Evaluation
standardized nursing care plan format
6. Discharge Summary Forms
A discharge summary ensures a well-coordinated transition from hospital to home. It emphasizes early recovery, reduced hospitalization time, and continued care.
The discharge summary includes:
The client’s condition at admission and discharge
A summary of care received
Interventions and education outcomes
Resolved and unresolved problems requiring follow-up
Client instructions on medications, diet, safety, follow-ups, and other special needs
Family roles and responsibilities in continuing care
A copy of the discharge summary is given to the client, while another is kept in the medical record.
Counselling plays a crucial role in empowering individuals to make informed decisions and achieve mental well-being. This post explores counselling types, the counselling process, essential tools and techniques, and the role of health education in enhancing its impact.
“Explore essential principles of health education, key approaches to public health education, and the stages of behavior change to transform health outcomes.”
Add to home screen for fast access to study materials, offline reading, and quick checkout.
Category
Articles
In-depth articles, study notes, and educational content for nursing, medical, paramedical, allied health, public health, pharmacy, dental, and Ayurveda students and faculty. Syllabus-mapped by RGUHS, INC, RUHS, KUHS, KNRUHS, WBUHS and other health science boards.
We use cookies. This site uses cookies for analytics (Google Analytics), advertising (Google AdSense), and essential features. By continuing, you agree. Learn more